


Chapter 4: Table of Contents
ONE-HAND TIES
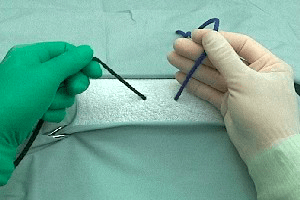
With the right hand (white glove) palm side up, hold the right strand (blue) between the thumb and index finger resting it across the tips of the ring, middle and index fingers. The left strand (black) is held by the left hand (green glove) between the thumb and index finger with the left palm facing the right hand. The left hand is moved towards the right hand in order to slide the left (black) strand between the index finger and the middle finger of the right hand resting the strand across the middle and ring fingers of the right hand. With the right hand remaining in a palm up position, the distal phalanx of the right middle finger is flexed over the left (black) strand and inserted under the right strand (blue). Then, by extending the previously flexed phalanx, the blue strand is displaced and pulled through the loop using the tips of the middle and ring finger of the right hand. While continuing to hold the right (blue) strand between the thumb and middle finger, the hands are then crossed-over applying even tension to each strand of suture in order to form the first throw of this hand tie. At this point, the right hand (holding the blue strand between the thumb and middle finger) should be crossing over the left hand (holding the black strand between the thumb and index finger). Uncross your hands forming a loop with the two strands of suture. Still holding the right strand (blue) between your right thumb and middle finger, extend the right index finger into the center of the loop formed by the crossed strands. Flex and extend the distal phalanx of the right index finger over the right (blue) strand, pulling it through the loop using the top of the index finger. Apply equal tension to both strands finishing the square knot (right hand towards the right side and left hand towards the left side).
TWO-HAND TIES

With the right palm (white glove) facing the left hand, the right strand (blue) is grasped between the thumb and middle finger and the index finger is extended underneath the blue strand to create tension. The left (black) strand is held within the palm of the left hand (green glove) – the left palm faces the right hand. The left thumb is inserted under the extended right index finger, around the right (blue) strand and back to the left of the left (black) strand. The left index finger is then inserted within the loop along side the left thumb. The right strand (blue) is then placed between the tips of the left thumb and left index finger. The right (blue) strand is then released by the right hand and pulled through the loop by the left thumb and index finger. The blue strand is then grasped once again by the right hand and the hands are crossed over applying even tension in order to tighten the first throw. At this point, the right hand (holding the blue strand) should be over the left hand (holding the black strand). When the hands are uncrossed, the left thumb is placed within the loop formed by the two strands of suture. The left index finger is then apposed to the tip of the left thumb and the apposed fingertips are rotated through the loop and towards the surgeon. The right (blue) strand is then grasped between the left thumb and index finger and is temporarily released by the right hand while it is passed back through the loop and away from the surgeon. The right strand (blue) is then re-grasped by the right hand, and even tension is applied to form the second throw and complete the square knot.